We've had some folks asking about how I put together the stylised water shader shown in this here tweet, so we thought it'd be a good idea to give a general overview of how it's done!
Yet another stylised water shader.#screenshotsaturday #madewithunity #gamedev #indiedev #unity3d pic.twitter.com/WGkM2CRtIU
— Remy Stuurwold (@R3mzo) April 18, 2020
We wanted something different from the common cel-shaded stylised toon water look so we developed this semi-realistic, 'in-between' water visual for our game. The aim of this post is not necessarily a tutorial but to give a conceptual overview of how you could use some or all of these techniques to accomplish something similar. I'm also not claiming to be particularly original or clever with how it's been done - there are so many others out there with amazing, in-depth resources that are crucial for me being able to put something like this together in the first place and I'll be linking to some of them too.
The entire effect is comprised of several distinct features that come together to sell the look and feel of cool, refreshing water that still fits with our game's art style. Some of these features are based in reality while others are complete artistic liberty and we think the interplay between these two concepts makes for a playful, fresh and interesting visual that matches the overall tone of the game.
We are using Unity as our engine of choice, and I personally prefer manually tinkering with the shader code, but the concepts outlined here should be generally applicable in any game engine or shader tool. The water object itself is simply a plane that intersects the terrain with the shader applied. It's a bit of a long post so without further ado, let's get to it!
Color and Light Absorption
Color seems like a good place to start. The key here is to keep it looking somewhat convincing while providing us with a lot of control. We're still using a physically-based lighting calculation with Smoothness and Metallic values to get that realistic vibe so we plug in some blue Albedo to kick us off. This will be our Surface Color.
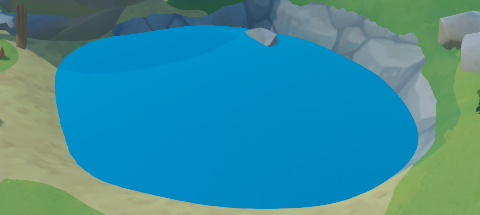
Mmmm, blue... In order to make it look a little less like plastic and a little more like water, we need to be able to see through it! To do this, I'm grabbing the screen space texture before the water is rendered as well as the depth texture which we will need very shortly.
If we ignore the physically based shading and simply sample the pre-water texture and multiply it by the water color to get the underwater color we would get this:
To get it looking more realistic, we need to tint the color of everything underwater by how much water is between it and the surface. Conceptually, color in the real world exists because the object absorbs all light of other wavelengths and reflects back only the frequencies of light that we perceive as its color. We use this concept to absorb more of the inverse water color from the pre-water color the more water there is between the bottom and the surface at that point from the camera's perspective. Oof, that sentence is dense. Let's go through it.
First, I take the inverse of the water color, which I'll call the Absorption Color. Then, I calculate the Absorption Value which controls how much color absorption there is. The Absorption Value is calculated from the view-space depth difference between the surface and the bottom of the pool. This depth value can be kept linear or modified to get different absorption falloffs. For some creative control, I am also multiplying the depth by a tweak value I call Absorption Strength. I then multiply the Absorption Color by this calculated Absorption Value to get what I call the Subtractive Color.
	fixed3 absorptionColor = float3(1,1,1)-_Color;
	float absorptionVal = 1.0 - exp2(-_AbsorptionStrength * depthVal);

	float3 subtractiveColor = absorptionColor * absorptionVal;
If we were to render the Subtractive Color now, this is what we get:
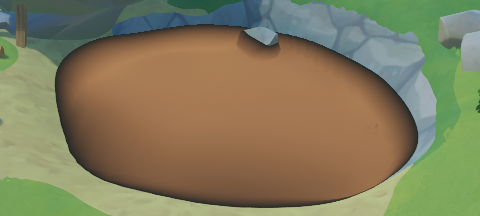
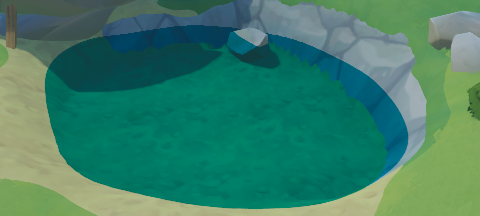
It's orange. Surely this is the opposite of what we want - correct! Let's now take the color sampled from the screen texture and subtract the Subtractive Color from it. What we will get is the absorbed color of everthing under the surface based on how deep the water is from the camera's perspective. Here I am also playing with the Absorption Strength tweak value:
Note how we still get some of the brighter areas of the ground texture coming through in areas of higher absorption giving the whole thing a bit more visual depth and interest.
We're almost there now. It can look pretty dark at high Absorption Strength values so let's now add this underwater color to the Surface Color we already have. A little bit of tweaking and BOOM we finally get the look we want!
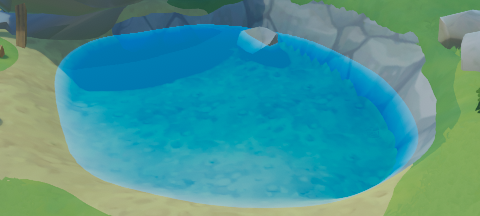
Now that we've got the base color done, this is a good foundation to add the next few features of our water. Of course we're not limited with rendering just water in this way. With different colors and tweak values we're able to represent as many questionable liquids as we'd like!
Surface Normals and Refraction
Next up, we'll give the surface some definition with animated normals. Water is almost never completely still (and our brains know this!) so by just having the surface normals animate even a little bit can give a huge impact for the presentation of water. This will also provide the basis for refracting everything underneath the water and really sell the look. Since we don't have any refraction yet, the surface normals are mostly visible in how the specular lighting is reflected on the surface of the water.
For this entire section, I'm going to have to direct you to this tutorial collection by Catlike Coding that I followed and referred to extensively. They have done such a great job detailing how to go about creating a seamlessly animating texture for a liquid flow effect and also a complete water tutorial with refraction. Generally, I can't recommend Catlike Coding enough - there's so much quality and depth to the tutorials that when I'm researching something related to a particular shader effect, I'm almost always going to end up there at one point.
Our surface is now animating but if you look at everything underneath the water it doesn't look quite right because it's all still very static. Once we add refraction and offset the UVs that we are using to sample for the Underwater Color, we get a nicely convincing result.
As you can see, changing the normal tiling and refraction strength can drastically alter the look of the water. Again, we're able to tweak the the normals and the refraction strength independently for maximum control even though it wouldn't be strictly "realistic" to do so - just set it up with whatever looks best!
Depth Foam
We have a fairly realistic looking water shader at this point. It's time to toon it up a bit with the depth foam. The foam effect is essentially a mask that we use to either return the color we have so far, or a specific flat foam color. This technique is very commonly used in a lot of stylised toon water visuals.
Our mask is made of two parts. The first part is a simple depth threshold. The second part is another depth threshold but with additional thresholded scrolling noise textures also applied to it. These two parts are combined to take the maximum value between them which is then used as the final foam mask.
For such a simple effect, it really has quite an impact to the overall tone and style of the water. It is immediately obvious that "true realism" is not the goal here despite everything else about the water leaning that way. Also note that since the foam is a depth effect, we can put anything in the water and it all "just works!"
Caustics
Caustics are the light patterns visible on the ground under the water due to the refraction of light from the surface. There are a lot of different techniques online on how this effect can be accomplished, ranging in complexity and realism. I went for a very simple approach here, as we only need a lick of realism.
A fantastic starting point to understanding caustics and how to go about implementing it is this tutorial by Alan Zucconi. His many tutorials are also a great resource and cover a wide range of topics in game development - definitely check this one out too.
Similar to how we did the foam, the caustics pattern is made by using a texture scrolling over itself to create the movement. This texture is then sampled using the world space XZ coordinates of the underwater geometry, multiplied by the light color, and added to the Underwater Color. We've essentially just projected the caustics texture straight down onto all the underwater geometry. The trickiest part here is actually correctly sampling the shadow mask so that the caustics don't appear in the shaded areas but that will certainly be engine specific and out of scope for us here.
Let's now turn back on the rest of the water and our look is complete!
Thanks for making all the way through! I hope this was a good general overview of how we achieved this particular look for the water. Let us know if this was informative and you'd like to see more of this in the future or if you have any other comments on how we gone done did this.
There's quite a bit here already so in the next part we'll explore how we made the water interactive with:
- Dynamic Flow
- Entry/Exit splashes
Be sure to hit us up on our socials or sign up to our newsletter so you don't miss out!