Welcome to the second part of our water shader overview! In this part we will be going over how we added some interactive effects to the water, giving it a lot more life. If you haven't checked out part one yet, you can do so right here.
The two interactive features we'll be going over are the dynamic flow introduced by other objects and the simple splash effect when something enters the water. We can see both effects in the above starfish bullying clip.
Dynamic Flow
The dynamic flow effect is created by sampling from a Flow Map and consequently manipulating the UV coordinates that I'm using for the various texture samples outlined in part one. I create and update the Flow Map through a combination of two methods I've found online. I've taken the method of flow UVs from the same Catlike Coding tutorial I pointed to previously and combined it with this Minions Art tutorial about using particles to simulate a wake as an object moves through the water.
Instead of using the particles to render a texture directly onto the water as in the Minions Art tutorial, I am additively rendering these Flow Particles to the Flow Map texture every frame and then blurring and reducing the existing flow. This allows for the water's flow to change and react over time as long as there are Flow Particles being emitted. That is essentially the key to the effect - objects that come into contact with the water will start emitting Flow Particles resulting in an ever-changing Flow Map.
Since we aren't rendering the Flow Particles directly, I am storing some flow information in the Flow Particle texture, resulting in the strange purple-ish color you can see in the debug render above.
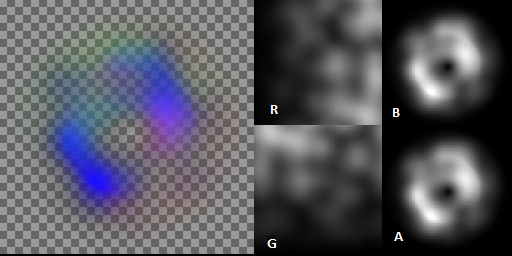
The Flow Particle texture is a composite of some information needed for the flow, stored in each of the channels (there is one free/unused channel). R - U speed, G - V speed, B/A - Intensity. Besides masking the flow and giving it a shape, another trick I'm using the intensity channel for is that I can selectively add newer, more "intense" particles to the Flow Map allowing me to "overwrite" what was previously there. You can see this happen when a new object enters the water as their entry ripple moves over the existing flow.
In addition to the Flow Particles that are emitted by moving objects, I am also constantly emitting some particles as long as the objects are in the water. This helps to be a little more convincing since water in real life is rarely still and would flow around the object. For both types of emission I am using the same texture on the particles. The particles are randomly rotated and scaling when added to each other so it already looks quite random and does not need any texture variations.
Lastly, I am replacing the water color with the same foam color as before when the flow intensity reaches a certain threshold. This creates a cool trail behind the moving obejcts and gives the whole effect a bit of an organic, natural motion while still maintaining the toony look.
Entry Splashing
The water entry effect is arguably the simplest part of them all yet is also very much the cherry on top. Once an object enters the water, we just emit some particles where they entered. That's it! Granted, one of the particles we emit is a specific Flow Particle that creates the expanding ripple effect. The other particles emitted are the "splash" - they are unlit and the same color as the foam for consistency. While simple, it adds a lot to the physicality of the water and provides a strong visual indicator for the start of the responsive water interaction.
What's interesting to note that although not expressly intending it, there is a foam ring that develops around the entry point due to how the flow intensity changes with how we have implemented the dynamic flow and the how the entry ripple particle expands. Awesome!
End
And there you have it - a brief look at what goes into creating a complete effect like this. Here at Half Past Yellow we're firm believers in experimentation and pushing our own boundaries and we take a lot of pride in that extra step of polish. Although it might not always come easy or quick, once we see the results we are grateful for having put in the effort! Of course there's always more we can add to it, but we're happy leaving it here for now.
I hope this writeup provided some useful insight into the pieces that make up this specific visual and that some of you other game devs out there can take the techniques mentioned here to create similar effects of your own. As always, write us on our socials if you have any comments, questions, suggestions!
Also please share with us other examples of "stylised realism" effects somewhat like this - we can't get enough of this stuff and would love to see more!